|
Editing Quick Sets allows you to customize your Quick Sets to meet your needs. Creating, editing, and applying your Quick Sets well can dramatically increase your productivity.
 To Edit a Quick Set: To Edit a Quick Set:
- Open the Printer Manager dialog (File > Manage Printers).
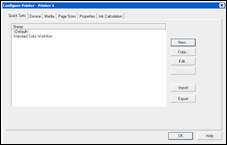
- Select your printer, and click Configure. This opens the Configure Printer dialog (Figure 1).
- From the Quick Sets tab, select the you want to edit.
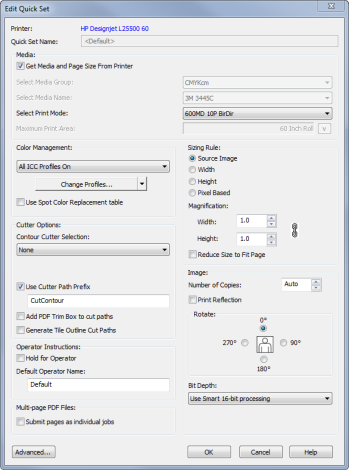
- Click Edit. This opens the Edit Quick Set dialog (Figure 2)
- Make any modifications to the Quick Set that you want to make, and click OK.
NOTE: You may also edit a Quick Set by clicking the Edit Quick Set button on the toolbar. However, you cannot change the Quick Set Name using this method.
In the Edit Quick Set dialog, you can modify any of the following options:
 Quick Set Name Quick Set Name
The Quick Set Name is the name that will appear in RIP-. If you are editing the default Quick Set, you cannot change the Quick Set Name.
NOTE: Using identifying features in your Quick Set Names will help you pick the appropriate Quick Set later on. For example, if your Quick Set uses the Stochastic dot pattern, including the term Stochastic in the name will help you correctly identify and use that Quick Set.
 Media Media
includes the following settings:
- Get Media and Page Size from Printer - Select this checkbox to automatically assign the media and page size specified for the printer to jobs when they are brought into RIP-Queue. If you do not want jobs to get the media and page size settings from the printer, uncheck this option and use the other options in this section to specify your settings.
- Select Media Group- Choose the Media Configuration Name that best matches the media or ink configuration of the media you are using.
- Select Media Name - Select the name of the Media that you want to use for this Quick Set.
- Select - Select the print mode you want to use for this Quick Set from the available options.
- Maximum Print Area - Select the page size of your media.
The Print Mode uses the following settings:
- Choose the Color Management option that best fits how you want the color of your jobs to be printed. Each color management option represents a different group of color profiles. For more information, see Color Management.
Change Profiles
- This option allows you to determine which profiles are used with your Quick Set. For more information, see ICC Profile Setup.
Use Replacement Table -
This option allows you to imbed named color libraries, such as . When this option is selected for PDF/PS files, it will use the color values defined in the spot color table. When this option is not elected, the color values will be defined as in the file.
 Sizing Rule Sizing Rule
The Sizing Rule determines the size of the printed image.
You can use any of the following options to determine size:
- Source Image
- The Source Image option maintains the size of the original image or a factor of that size. This is the default and most common Sizing Rule. When using Source Image, you may use the Magnification option to enlarge or reduce the size of an image.
- Width
- The Width option allows you to determine a standard width for your images. All images using this Quick Set will be enlarged or reduced to match the width you determine.
- Height
- The Height option allows you to determine a standard height for your images. All images using this Quick Set will be enlarged or reduced to match the height you determine.
- Pixel Based
- The Pixel Based option maps the source file to the printer resolution. For example, if you use 600 dpi source images that you want to print at 300 dpi, the images will be enlarged by a factor of two to maintain the number of pixels in the source image. The Pixel Based sizing rule functions as the Source Image sizing rule when using PostScript images.
- Magnification -
Use this option to enlarge or reduce the size of the image when it is being opened with this quick set.
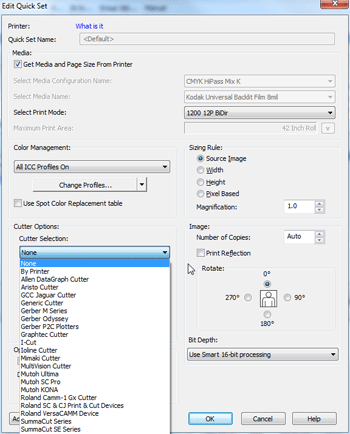
- Contour Cutter Selection - The drop-down list contains the names of all cutters or cutter families supported by RIP-Queue. The By Printer option is for use with printers that have an on-board cutter. When this option is selected, RIP-Queue will print the image and then immediately send the cut commands to the device. A cut file is not generated. For all other selections, a cut file is generated for CUT-. CUT-Server is used to manage and send the cut data to the specified cutting device. (See CUT-Server help for more information).
- Use Cutter Path Prefix - In order for spot colors to be interpreted as cut paths, the name of the spot colors in the Postscript files must be defined in the Use Cutter Path Prefix option. The name entered in the Use Cutter Path Prefix field must have a prefix identical to the name of the spot colors in the file. For example, if CutContour was entered in the Use Cutter Path Prefix field, spot colors named CutContour1, CutContour2, etc. would be converted into cut paths. However, spot colors named 1CutContour, 2CutContour, etc. would not be converted.
- Add PDF Trim Box to cut paths - This option works only with PDF files and creates a cut path around the image according to the border of the PDF.
- Generate Outline Cut Path - This option generates a cut path around the outside edge of each tile.
The controls in this group allow you to set the default parameters instructing RIP-Queue how to print all of the images processed with this Quick Set.
- Number of Copies - This determines how many copies will be made of the job. To allow the number of copies to be specified by the Postscript file, set this option to Auto.
- Print Reflection - This option prints the job as a mirror-image of the original image file. This option is typically used when printing on backlit media. This option flips the image at print time, and does not appear to be flipped in the printing preview. By flipping the image at print time, it reduces the time it would take to reprocess the image if flipped before.
- Rotate - You can rotate your image by 0º, 90º, 180º, or 270º by clicking the appropriate option. Rotating an image may improve nesting by maximizing media usage.
The controls under this heading allow you to set the defaults telling RIP-Queue whether to wait for operator interaction or not and the default operator name attached to each job.
- Hold for Operator - This option stops a job from printing until an operator chooses to print the job.
- Default Operator Name - The Default Operator Name is the User name attached to each job. If you have many different users sending jobs from various systems, consider setting the Default Operator Name for each system.
When printing a multi-page PDF file, you can select this option to print each page as a separate job.
You can apply a Quick Set to a job by selecting the proper Quick Set in the Open dialog. This can be done from RIP-Queue or Editor.
|

Figure 1

Figure 2

Figure 3
|


 To Edit a Quick Set: